Change a Variable with a Potentiometer
Change a variable with a potentiometer and Arduino
Written By: Cherie Tan

Difficulty
Easy
Steps
11
Potentiometers, also known as variable resistors, can be found in many Arduino projects.
In this guide, you will learn to use a potentiometer to turn values up and down and provide variable resistance. These values are read into the Arduino board as an analog input.
After completing this guide, you will be able to use potentiometers in your projects. Some examples of what you could do with a potentiometer are to control LEDs, MIDI or servos.
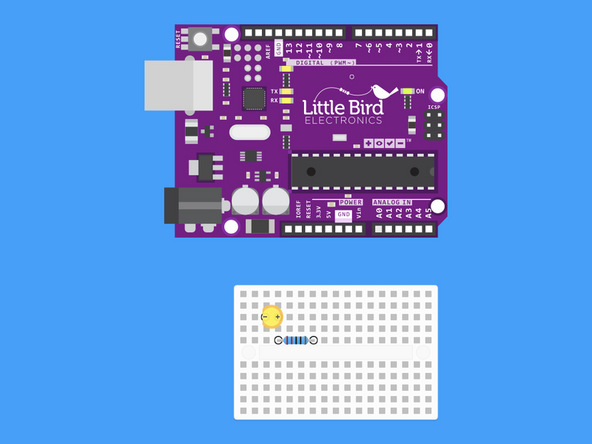
Insert a 220 Ohm resistor so that one leg is in line with the positive leg of our LED.
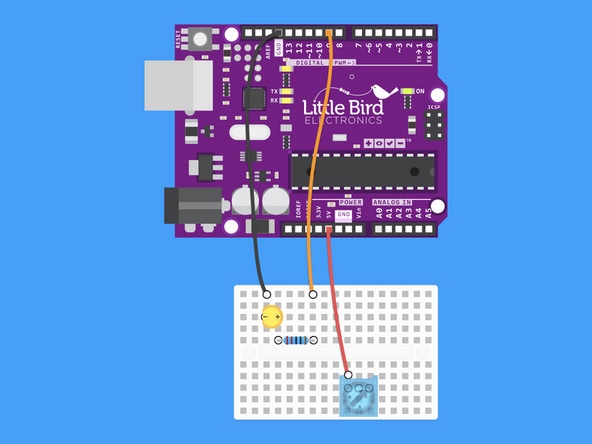
Connect the first pin of the potentiometer to the Arduino's 5V pin.
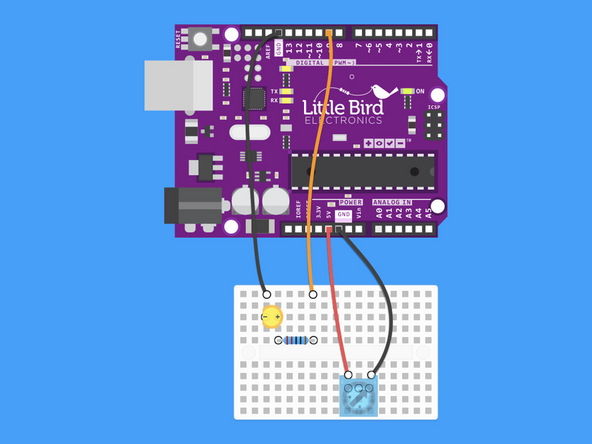
Connect the last pin on the potentiometer to the other Ground on the Arduino.
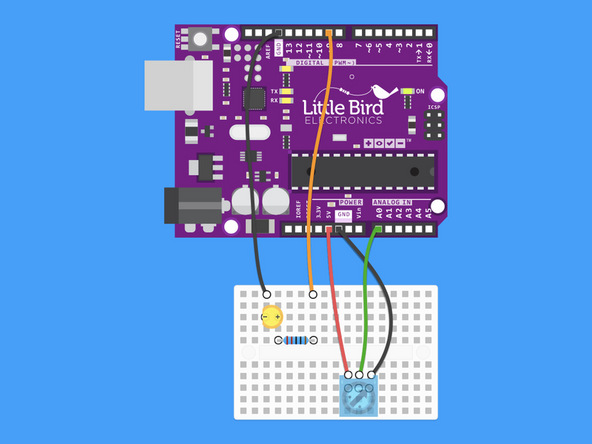
Connect the middle signal pin of the Potentiometer to Analog pin 0
int potPin = 0;    // Analog input pin that the potentiometer is attached to
int potValue = 0;  // value read from the pot
int led = 9;      // PWM pin that the LED is on.

void setup() {
  Serial.begin(9600);
  pinMode(led, OUTPUT);
}

void loop() {
  potValue = analogRead(potPin); // read the pot value
  analogWrite(led, potValue/4);  // PWM the LED with the pot value (divided by 4 to fit in a byte)
  Serial.println(potValue);      // print the pot value back to the debugger pane
  delay(10);                     // wait 10 milliseconds before the next loop
}
Copy this code to the Arduino IDE and upload it.
Now when you turn the blue potentiometer the light should go from dull to bright!
int sensorPin = A0;    // The potentiometer is connected to analog pin 0
int ledPin = 9;      // The LED is connected to digital pin 9
int sensorValue;        //We declare another integer variable to store the value of the potentiometer

void setup() // this function runs once when the sketch starts up
{
  pinMode(ledPin, OUTPUT);
}

void loop() // this function runs repeatedly after setup() finishes
{
  sensorValue = analogRead(sensorPin);

  digitalWrite(ledPin, HIGH);     // Turn the LED on
  delay(sensorValue);             // Pause for sensorValue in milliseconds
  digitalWrite(ledPin, LOW);      // Turn the LED off
  delay(sensorValue);             // Pause for sensorValue in milliseconds
}
Here is some alternate code that changes the rate of the blinking LED


